
How to configure router on a stick on Cisco routers
If you’re new to networking—whether as a student or an aspiring engineer—you’ve likely heard the term “Router on a stick” and wondered, “What is that supposed to mean?”
It refers to a setup where a router and a switch are connected through a single Ethernet link configured as an 802.1Q trunk. This configuration enables inter-VLAN routing in environments where multilayer switches aren’t available.
In this setup, the switch operates at Layer 2 with all VLANs configured, while the router takes care of routing between those VLANs.
When should I use this?
Imagine a situation where your network has too many devices in a single broadcast domain. This setup can create performance issues and expose you to security risks. To prevent that, it’s best to divide the network into two or more segments.
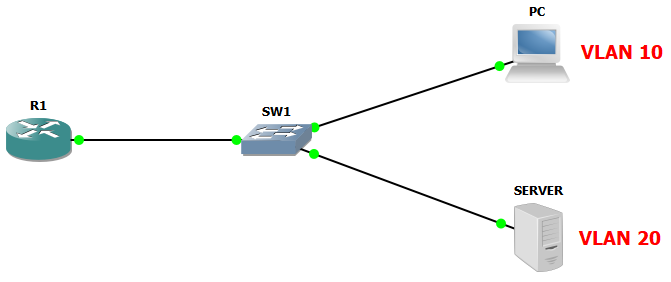
In the next figure, you’ll see the scenario we’ll be working with in this lab exercise.
I’ll walk you through how Router on a Stick works and how to set it up from scratch, so you can practice it as many times as needed to really get the hang of it.
Steps to set up Router on a stick
If you’re starting from scratch, you’ll need to create the VLANs first—unless you’re working in a production environment where they might already exist.
- Step 1: Create and name (optional) VLANs in the switch.
Switch#configure terminal
Switch(config)#vlan 10
Switch(config-vlan)#name Users
Switch(config-vlan)#exit
Switch(config)#vlan 20
Switch(config-vlan)#name Servers
After creating the VLANs, you need to assign each one to its respective port, whether it’s for a user or a server.
- Step 2: Configure ports in access mode and with the proper VLAN (description is optional).
Switch#configure terminal
Switch(config)#interface GigabitEthernet0/1
Switch(config-if)#description User
Switch(config-if)#switchport mode access
Switch(config-if)#switchport access vlan 10
Switch(config-if)#exit

Switch(config)#interface GigabitEthernet0/2
Switch(config-if)#description Server
Switch(config-if)#switchport mode access
Switch(config-if)#switchport access vlan 20
Finally, and just as important, you need a trunk link that carries the VLANs to the router.
I usually use the last ports for this, but it doesn’t really matter which ones you choose — what’s important is that both the router and switch are configured to use 802.1Q.
- Step 3: Set up the switch port as a trunk.
Switch#configure terminal
Switch(config)#interface GigabitEthernet0/24
Switch(config-if)#description Uplink-to-Router
Switch(config-if)#switchport mode trunk
Up to this point, we’ve configured the switch; now, let’s proceed with setting up the router.
This is the part where you’ll want to really focus.
When setting up “router on a stick,” you use a single physical interface on the router. This interface hosts multiple logical interfaces, called sub-interfaces.
Each sub-interface is linked to a specific VLAN and is responsible for routing all the traffic to and from that VLAN.
A good practice is to name each sub-interface using the same number as its corresponding VLAN ID—this makes it easier to identify which sub-interface belongs to which VLAN.
Here’s an example of how to set up a router on a stick configuration.
- Step 4: Configure sub-interfaces.
Router#configure terminal
Router(config)#interface GigabitEthernet0/0
Router(config-if)#description Router-on-a-stick
Router(config-if)#no shutdown
Router(config-if)#exit
Router(config)#interface GigabitEthernet0/0.10
Router(config-subif)#description VLAN-10-Users
Router(config-subif)#encapsulation dot1q 10
Router(config-subif)#ip address 192.168.10.254 255.255.255.0
Router(config-subif)#exit

Router(config)#interface GigabitEthernet0/0.20
Router(config-subif)#description VLAN-10-Servers
Router(config-subif)#encapsulation dot1q 20
Router(config-subif)#ip address 192.168.20.254 255.255.255.0
¡DONE!
You’ve now completed the router-on-a-stick lab setup.
Don’t forget to save the configuration.
Router#copy running-config startup-config
Destination filename [startup-config]?
Building configuration...
[OK]
Switch#copy running-config startup-config
Destination filename [startup-config]?
Building configuration...
[OK]I’d be happy to answer any questions you have—feel free to leave a comment below!
I find this Keith Barker’s video very useful.
Place For Tech
Everything you need to know about tech!