
How to configure a GRE Tunnel on a Cisco router
A GRE tunnel is used to connect remote sites via the Internet, an alternative to L2L or MPLS.
In this tutorial, you will learn what is and how to configure a GRE tunnel as well as how it works.
I’ll leave technical details (configuration) for the last.
What is a GRE tunnel?
A GRE tunnel (Generic Routing Encapsulation) is a logical interface in a Cisco router that encapsulates all packets that go through it.
GRE tunnels are independent from each other at each router, the interface activates itself as soon as configuration is done. This means that a GRE tunnel does not keep status information about the other end tunnel.
For example, if a tunnel end shuts down, the other end will never know and will keep its own tunnel up and active.
If there are static routes, these would not be removed from the routing table, meaning all traffic would still try to go through the tunnel and will be dropped.
In some cases, it’s better to use a dynamic routing protocol.
How do GRE tunnels work?
The function of a GRE tunnel is to establish a point-to-point connection between two remote locations as if you had both routers connected locally.
It is established through an Internet connection at both ends, but it is not limited to it, it could be even established through MPLS or even a L2L link, but it’s not that common.
What establishing this tunnels through the Internet benefits from is that you will have LAN to LAN network connectivity as if you had both ends (routers) at the same place.
So, communication will be possible without NAT in between.
The GRE tunnel encapsulates all packets that pass through it so that the exterior (Internet) sees them with a public IP address until it gets to the other end and then they are “put back” with the private IP addresses.
CONFIGURATION
This is the network topology that will be used for this example.
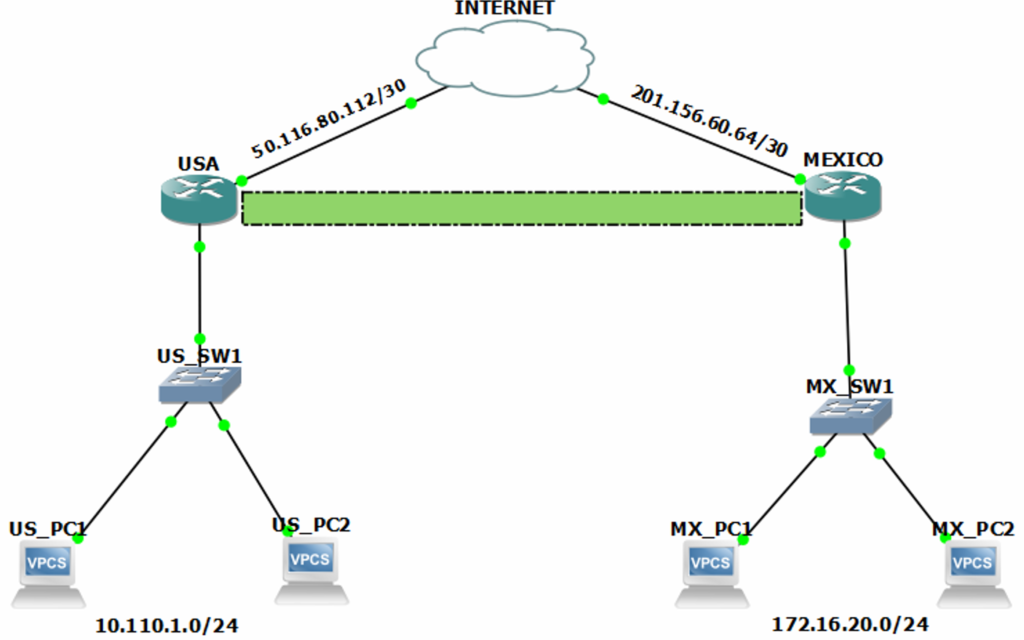
IP addressing has veen assigned to each network interface.
Routing has been configured on both routers.
USA router configuration.
USA#show ip interface brief
Interface                     IP-Address      OK? Method Status                Protocol
GigabitEthernet0/0            50.116.80.113   YES manual up                    up
GigabitEthernet0/1            10.110.1.254    YES manual up                    up
GigabitEthernet0/2            unassigned      YES unset  administratively down down
GigabitEthernet0/3            unassigned      YES unset  administratively down down
USA#configure terminal
Enter configuration commands, one per line. End with CNTL/Z.
USA(config)#interface Tunnel 0
USA(config-if)#ip address 192.168.200.1 255.255.255.0
USA(config-if)#tunnel source 50.116.80.113
USA(config-if)#tunnel destination 201.156.60.65
USA(config-if)#end
The command tunnel source will be followed by the own public IP address that you will use to reach the other end.
Similarly, the command tunnel destination will have the other end public IP address.
You will most likely run ICMP tests to confirm you have network connectivity between both ends.
Once this configuration is set, the interface will turn on (up/up).
USA#show ip interface brief
Interface                     IP-Address      OK? Method Status                Protocol
GigabitEthernet0/0            50.116.80.113   YES manual up                    up
GigabitEthernet0/1            10.110.1.254    YES manual up                    up
GigabitEthernet0/2            unassigned      YES unset  administratively down down
GigabitEthernet0/3            unassigned      YES unset  administratively down down
Tunnel0                       192.168.200.1   YES manual up                    up
USA#
I’ll do the same in the other router, but now reverting IP addresses in the tunnel configuration.
MEXICO router configuration.
MEXICO#show ip interface brief
Interface                     IP-Address      OK? Method Status                Protocol
GigabitEthernet0/0            201.156.60.65   YES manual up                    up
GigabitEthernet0/1            172.16.20.254   YES manual up                    up
GigabitEthernet0/2            unassigned      YES unset  administratively down down
GigabitEthernet0/3            unassigned      YES unset  administratively down down
MEXICO#configure terminal
Enter configuration commands, one per line. End with CNTL/Z.
MEXICO(config)#interface Tunnel 0
MEXICO(config-if)#ip address 192.168.200.2 255.255.255.0
MEXICO(config-if)#tunnel source 201.156.60.65
MEXICO(config-if)#tunnel destination 50.116.80.113
MEXICO(config-if)#end
Configuration is very similar to the other router, but the IP addresses are switched.
Now, the tunnel is ready to go.
MEXICO#show ip interface brief
Interface                     IP-Address      OK? Method Status                Protocol
GigabitEthernet0/0            201.156.60.65   YES manual up                    up
GigabitEthernet0/1            172.16.20.254   YES manual up                    up
GigabitEthernet0/2            unassigned      YES unset  administratively down down
GigabitEthernet0/3            unassigned      YES unset  administratively down down
Tunnel0                       192.168.200.2   YES manual up                    up
MEXICO#
The only thing left to be configured now are the static routes through the tunnels to reach each LAN at both ends.
USA
USA#
USA#configure terminal
USA(config)#ip route 172.16.20.0 255.255.255.0 192.168.200.2
USA(config)#end
USA#
USA#show ip route static
     172.16.0.0/24 is subnetted, 1 subnets
S       172.16.20.0 [1/0] via 192.168.200.2
S*   0.0.0.0/0 [1/0] via 50.116.80.114
USA#
MEXICO
MEXICO#
MEXICO#configure terminal
MEXICO(config)#ip route 10.110.1.0 255.255.255.0 192.168.200.1
MEXICO(config)#end
MEXICO#
MEXICO#show ip route static
     10.0.0.0/24 is subnetted, 1 subnets
S       10.110.1.0 [1/0] via 192.168.200.1
S*   0.0.0.0/0 [1/0] via 201.156.60.66
MEXICO#
Remember…
A GRE tunnel provides a “local” type of connection between two remote sites through the Internet.
Keep in mind that this method does not have data encryption mechanism, thus.
That’s why it is recommended to use IPSec over GRE to accomplish this, but it is not mandatory.
NETWORK CONNECTIVITY TESTS
Successful network connectivity between the tunnels at each end.
USA
USA#show ip interface brief | i Tunnel
Tunnel0                       192.168.200.1   YES manual up                up
USA#
USA#ping 192.168.200.2

Type escape sequence abort.
Sending 5, 100-byte ICMP Echos to 192.168.200.2, timeout is 2 seconds:
!!!!!
Success rate is 100 percent (5/5), round-trip min/avg/max = 32/38/48 ms
USA#
MEXICO
MEXICO#show ip interface brief | i Tunnel
Tunnel0                       192.168.200.2   YES manual up                up
MEXICO#
MEXICO#ping 192.168.200.1

Type escape sequence abort.
Sending 5, 100-byte ICMP Echos to 192.168.200.1, timeout is 2 seconds:
!!!!!
Success rate is 100 percent (5/5), round-trip min/avg/max = 88/90/92 ms
MEXICO#
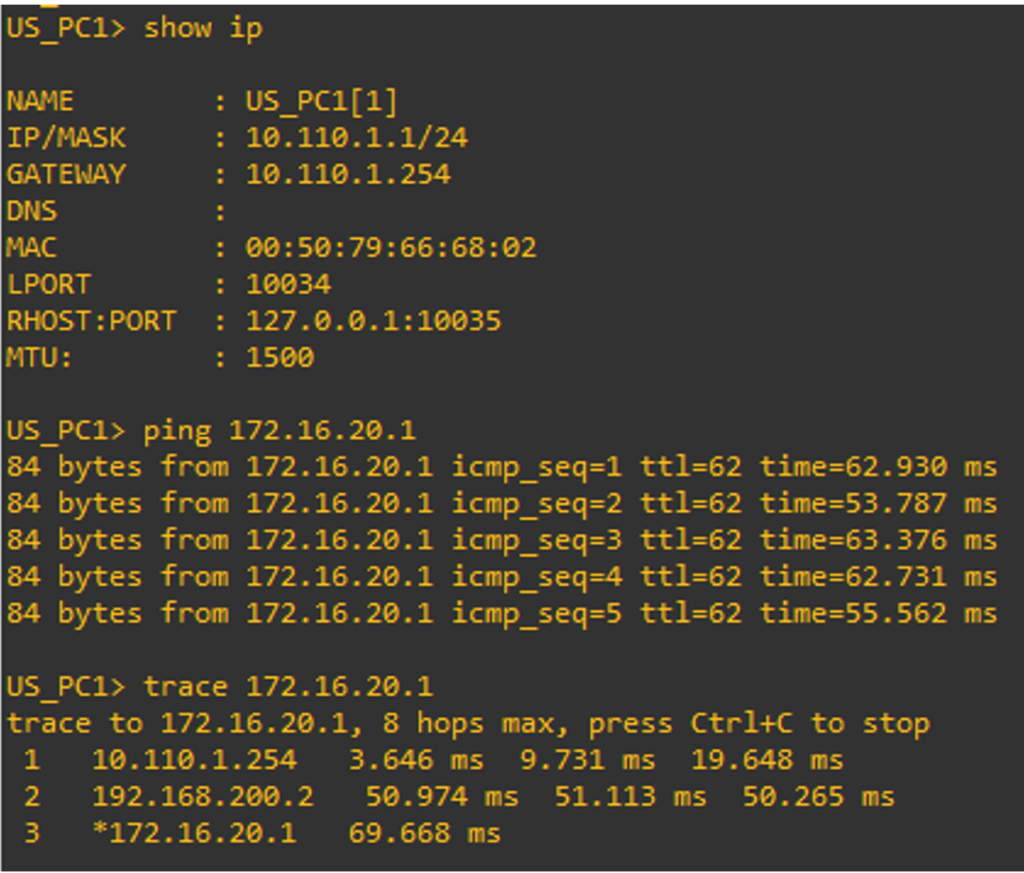
From USA PC 1 to MEXICO PC 1.
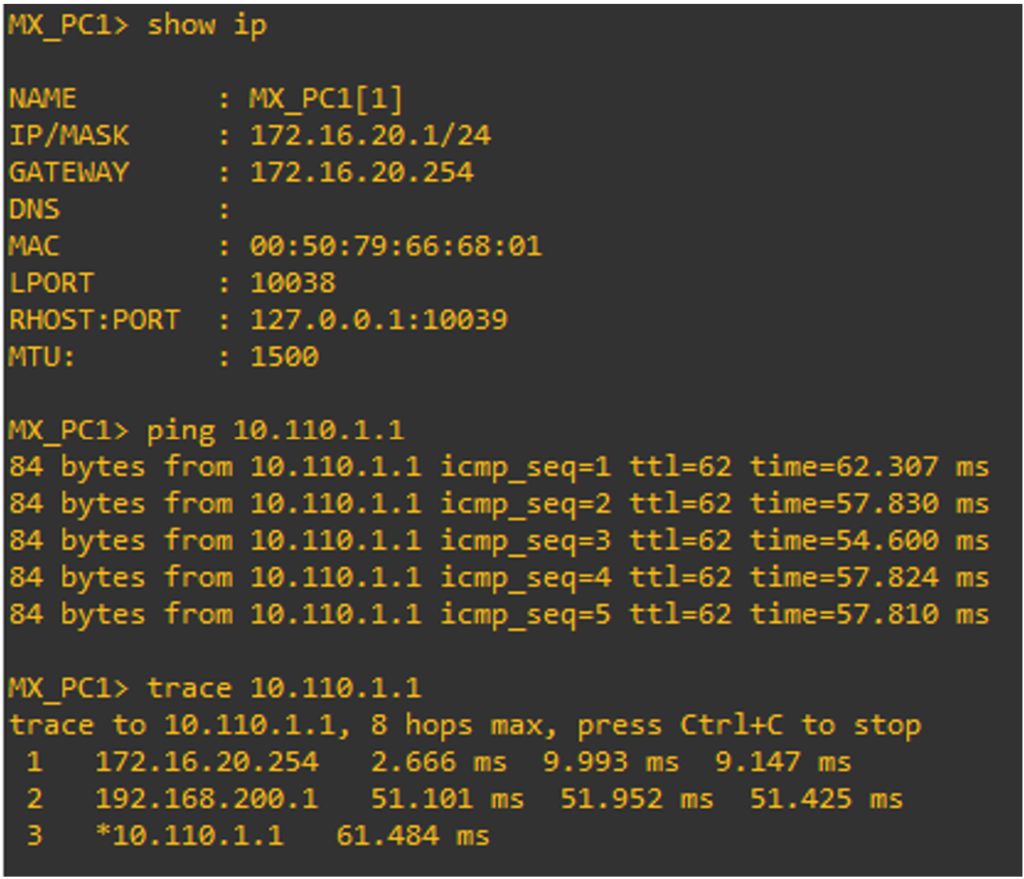
From MEXICO PC 1 to USA PC 1.
This is how you configure a GRE tunnel and have it ready to work and connect your remote sites together through the Internet.
A YouTube video on how to configure a GRE tunnel.
Feel free to leave a comment down below if you still have doubts.