
How to configure Policy-Based Routing in Cisco routers
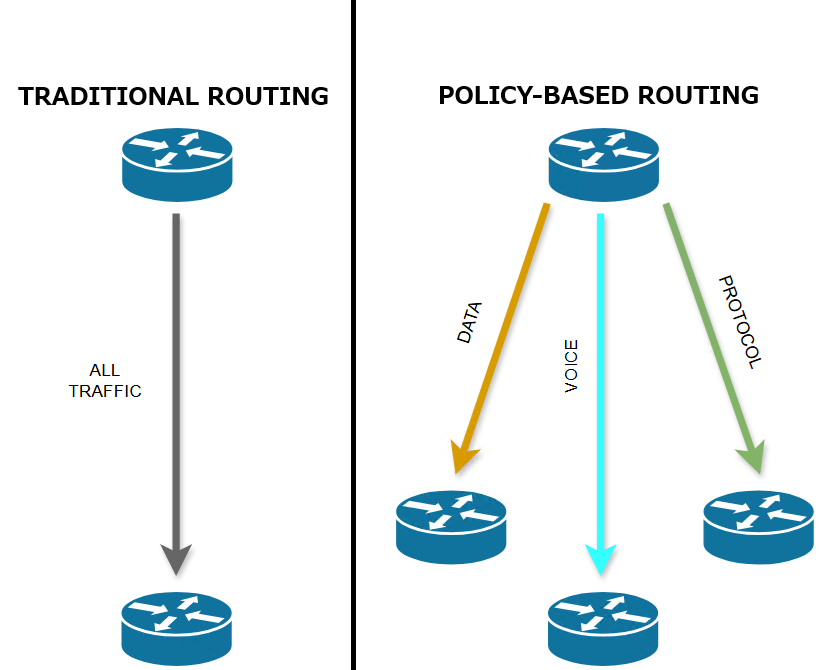
Traditional routing relies solely on destination IP addresses to make forwarding decisions. But what if you need to route traffic based on other factors like source IP, application type, or QoS requirements?
Enter Policy-Based Routing (PBR)—a powerful Cisco feature that overcomes the limitations of destination-based routing. As a network engineer, PBR is your scalpel for designing intelligent traffic paths. Let’s break it down!
What is Policy-Based Routing (PBR)?
PBR lets you override the default routing behavior of routers by defining custom policies. Instead of forwarding packets based solely on destination IPs (via the routing table), PBR uses user-defined criteria to:
- Redirect specific traffic down preferred paths
- Implement QoS policies (e.g., prioritize VoIP)
- Route traffic from certain sources via firewalls or WAN accelerators
- Balance load across multiple links
Key Concept: PBR processes packets before the normal routing table. If a packet matches your policy, it’s routed per your rules—bypassing standard routing.
How PBR Works: The Mechanics
PBR relies on three core components:
- Access Control Lists (ACLs): Identify traffic (e.g.,
source IP 192.168.1.0/24). - Route Maps: Define “match” conditions and “set” actions.
- Apply to Interface: Enforce the policy on ingress traffic.
Critical commands:
match ip address ACL_NAME: Associates an ACL with the route map to identify the traffic that should be matchedset ip next-hop: Forces next-hop IP for matched trafficset interface: Directs traffic to a specific egress interface
Use only one of the two: set ip next-hop or set interface, since they serve the same purpose in defining the next hop for matched traffic.
Basic PBR Configuration Example
Scenario: Redirect traffic from 192.168.1.0/24 (Engineering VLAN) via a dedicated ISP (203.0.113.1), while all other traffic uses the default route.
Step 1: Create an ACL to Match Engineering Traffic
ip access-list extended ENG_TRAFFIC
 permit ip 192.168.1.0 0.0.0.255 any
Step 2: Configure the Route Map
route-map PBR-EXAMPLE permit 10
 match ip address ENG_TRAFFIC
 set ip next-hop 203.0.113.1  // Overrides routing table!
!
route-map PBR-EXAMPLE permit 20 // Allow non-engineering traffic
Note: Sequence 20 with no match acts as a “permit any” for remaining traffic.
Step 3: Apply the Route Map to the Ingress Interface
interface GigabitEthernet0/1
 description LAN-ENG-VLAN
 ip policy route-map PBR-EXAMPLE
Step 4: Verification Commands
show route-map PBR-EXAMPLE: Verify route-mapshow ip policy: Check interface assignmentdebug ip policy: Real-time PBR tracing (use cautiously!)traceroute: Validate path (e.g. traceroute 8.8.8.8 source 192.168.1.1)
Cisco guide on configuring Policy-Based Routing here.
Real-World Use Cases
- Cost Savings: Route backup traffic via a cheaper link.
- Security Compliance: Force sensitive traffic through an inspection firewall.
- QoS: Prioritize video conferencing traffic with
set dscp. - Multi-Homing: Direct SaaS traffic to a low-latency ISP.
Pro Tips
- Test First: Always validate policies in a lab. Misconfigured PBR can cause blackholes.
- Order Matters: Route maps process sequences top-down. Place specific matches first!
- Fallback: Include a
permit anyclause (like sequence20above) to avoid dropping traffic. - PBR ≠ CEF: PBR disables Cisco Express Forwarding (CEF) for matched traffic—impacting performance.
PBR hands you granular control over traffic paths—far beyond what traditional routing offers. While powerful, use it judiciously: complex PBR can complicate troubleshooting. Start with simple policies, verify relentlessly, and unlock scenarios where destination-based routing falls short.
Place For Tech
Everything you need to know about tech!